
Tuesday, November 24, 2009
Dustin Pike freebie and sale!
If, like me, you are a fan of Dustin Pike's dragons, monkeys and other creatures, you will absolutely have to check out his blog today and tomorrow. He is having a one-day only blow-out sale of images past & present tomorrow, Nov 25 (even though there is a hint in his blog to beat the rush and buy today). I have already downloaded mine and it's killing me that I have to wait another 5 hours for work to end so I can use them.


Sunday, November 22, 2009
Time to start on Christmas
It is mid-November so more than time to start on Christmas cards. My latest uses a digital stamp freebie from Phindy's Place and a colour challenge from PCP Color Challenge.
I started by colouring the angel with my copics. Then I used silver Stickles on the stars for ultimate shine. I cut the angel out and pop-dotted her on a plain yellow cardstock and then drew in the silver swirls with more Stickles. The sentiment is from Penny Black and it's simply stamped in black on a blue shadow background (made by stamping with the reverse side of the sentiment stamp). Final touch was the addition of crystal Stickles on the angel's wings.

Thanks for looking!
I started by colouring the angel with my copics. Then I used silver Stickles on the stars for ultimate shine. I cut the angel out and pop-dotted her on a plain yellow cardstock and then drew in the silver swirls with more Stickles. The sentiment is from Penny Black and it's simply stamped in black on a blue shadow background (made by stamping with the reverse side of the sentiment stamp). Final touch was the addition of crystal Stickles on the angel's wings.

Thanks for looking!
Tuesday, November 17, 2009
Copic Buzz Challenge
I'm so excited to have a chance to be a guest designer on the Copic Buzz Challenge! Thanks to Robyn's Fetish for providing a free image for me use - isn't the fireplace cute? Of course everything is coloured using my Copics. I am particularly proud of the glow from the fire - it worked out very well.
Card #1 – 3D Card

The original digital stamp had 4 stockings hanging from the mantle but the 2 outside stockings were only sketched in lightly so they didn't look very good when coloured. I hid the sketched-in stockings on each card by “moving” the two middle stockings and adhering them with pop dots over the sketched stockings.
Then I added the pair of mice in stockings (Penny Black stamp) to the center. The cat in the sweater is also a Penny Black stamp. I added Stickles glitter glue to the cat’s sweater, holly berries and stockings. The cat is sitting on an actual piece of wrapping paper that I curled & distressed!
Card #2 – Shadow box card

The scallop circle is cut on my Cricut and then inked with Versamark frost to give it shine.
I made my own patterned paper by stamping the blue cardstock with a holly stamp I got free in a magazine using the same Versamark frost ink.
I extended the fireplace by creating a chimney from pieces of another copy of the fireplace digital stamp.
Well, that's it for today. I have to go work madly on a scrapbook I'm making for a co-worker who is retiring this week. Nothing like leaving it to the last minute!!!
Saturday, November 14, 2009
In Hot Water?
Dustin Pike released his latest freebie (a Turkey in a cooking pot) yesterday and I had to make a card with it immediately. Since Thanksgiving is long over I didn't want to make a Thanksgiving card so I ended up creating the following:
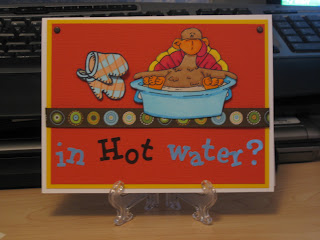

I think the card is quite amusing (if I do say so myself) and I also succeeded in meeting 2 different challenges with it - I used the sketch from Copic Buzz Challenge #22 and the colour combo came from a colour challenge from PCP Color Challenge #42.
I used my copics to colour the turkey as well as the oven mitts (which were a free clipart image). The sentiment is just some old alphabet stickers I had in the drawer.
Thursday, November 12, 2009
CKC Projects - A Greeting for Every Season
 I had such a great time at CKC (Creating Keepsakes Convention) in Seattle! Jacqui, Lee & I took tonnes of classes and shopped until we dropped. All of the classes were quite interesting although VERY fast-paced. I didn't complete a single project during classtime. Now that I'm home and almost unpacked, I thought I would share some of the projects as they are completed.
 This first set of cards was part of the "A Greeting for Every Season" class that was sponsored by Technique Tuesday. The cards were made with their "Long Stemmed Sentiments" stamp set and some technique tiles (which are basically off-white chipboard shapes).
My favorite is the bottom left card with all the pussywillows. I learned the greatest (easiest) technique for using stamps. Before stamping the "Thinking of You" sentiment, we flipped the stamp over and stamped the shadow box using the backside of the stamp. What an easy way to create a perfect sized shadow for any sentiment or image! The pussywillows are ghost-stamped (ink the stamp, stamp on paper and then stamp again without re-inking) which is a favorite technique of mine.
The fern card (top left) is made of two technique tiles that I inked to achieve a mottled look. There is dark green cardstock behind the fern cutout itself.
The vase card (top right) is very elegant with its bunch of flowers inside a hand-cut vase. I added some glossy accents to the flowers to give even more dimension.
The final card is still in need of a sentiment but I haven't decided what to use. The card itself was quite labor-intensive. The 3 birds are hand-cut and the technique tile branch is inked.
Well, that's it for now. I expect Jacqui will post her cards onto her blog soon (hint, hint Jacqui) so hopefully she will add a link so everyone can see hers. Same class but very different results!
PS - Jacqui has posted her cards on her blog - check it out - http://craftyjacks.blogspot.com/2009/11/fall-fun-and-classes.html
PS - Jacqui has posted her cards on her blog - check it out - http://craftyjacks.blogspot.com/2009/11/fall-fun-and-classes.html
Tuesday, November 10, 2009
Cinema Saturday Creative Challenge
The latest challenge on Cinema Saturday Creative Challenge is to create a wedding card inspired by the movie "My Big Fat Greek Wedding". I decided to do something a little different from a traditional wedding card in order to capture the unrestrained joy of the movie (I also have a co-worker that has been trying to get her significant other to the altar so I figure this card will be great if she ever succeeds).
 The sentiment inside says "Congratulations on making it to the altar!"
I used a sketch from another challenge - (Scrap 'n Stamp blog - for the layout. The image is a digital stamp from Mo's Digital Pencil that is coloured with Copics. It doesn't show well in the picture but I've used a Glaze pen on the dress to add shine to the dots and to the confetti. The flourish on the left is also covered in glitter.
 The sentiment inside says "Congratulations on making it to the altar!"
I used a sketch from another challenge - (Scrap 'n Stamp blog - for the layout. The image is a digital stamp from Mo's Digital Pencil that is coloured with Copics. It doesn't show well in the picture but I've used a Glaze pen on the dress to add shine to the dots and to the confetti. The flourish on the left is also covered in glitter.
Wednesday, November 4, 2009
Mo's Digital Pencil Challenge #4
Challenge #4 at Mo's Digital Pencil Challenge Blog was to create a card using anything BUT a standard fold. I decided to try a stair fold that was used by Lydia Bancroft in her design team sample.

The stamp is one of my favorites from Mo - the two cats are just enjoying themselves so thoroughly. And I'm pretty sure that they are not singing in tune.
I coloured the images with Copics and then added some stickles for extra shine (glitter is always good!). The presents on the front "step" are a cardstock sticker. The "Fa La La" was printed off my computer.

The stamp is one of my favorites from Mo - the two cats are just enjoying themselves so thoroughly. And I'm pretty sure that they are not singing in tune.
I coloured the images with Copics and then added some stickles for extra shine (glitter is always good!). The presents on the front "step" are a cardstock sticker. The "Fa La La" was printed off my computer.
Subscribe to:
Posts (Atom)