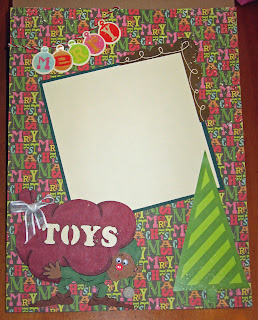
The first project is a scrapbook layout that I plan to use for the boys' picture with Santa this year.
 I coloured the toy-toting chipboard elf using Copic markers and then added some white fun flock to the pom pom of the hat. At first, I had the toy bag letters done in silver glitter but this was one of those rare cases where glitter just didn't work. I ended up pulling out the letters and then adhering plain cream paper behind the openings. I think it ends up pulling the page together more since I've used the same cream paper for the matting of the photo (which is still to come). A scrap of ribbon to "tie" the bag shut and all that was left was the face. I glued on google eyes and then used a tiny button for the nose. I'm not sure about the nose yet - does it look festive? or does it look porcine (piglike)? What do you think ...
The background paper is extremely busy so I made the matte & frame for the photo extra large. I used a minimum of other embellishments, just a couple of cardstock stickers (the tree and the brown corner) and a coloured cord to hold sticker letters to form the banner heading.
Again, I started by colouring the chipboard elf with Copic markers. The chipboard shape was so detailed that it made the colouring quite straightforward - I didn't have to mess around with drawing in details or wondering where parts left off. This time I chose gold Stickles for the end of his hat (see, I can't stay away from glitter for too long). For the gift, I cut scrap paper to ft and then attached it to the chipboard. I coloured the top and right edge with a toner grey marker to give a 3-D feel. I cut off the little guy's hands (he was so brave - lol) and then re-attached them to the front of the paper-covered gift so that it looks like he is really holding it. Again, I added google eyes and a button nose.
I filled the bag with Hershey Kisses and then sealed it with a white ribbon that matches the ribbon on the gift box. At first I just used the ribbon but it was too plain so I added a couple of border-punched strips. I love this project except (there is always an "except" or "but' with me) that I wonder if the white ribbon is too thin for the bag top. I wonder if I should replace it with a thicker ribbon prior to giving this away. I'd love your votes!
Well, it's nearing the end of the first week of December and Christmas is rushing nearer. Yikes!
Challenges - Project #1:
Totally Gorjuss - include a tree (the sticker tree)
Pollycraft Monday - chipboard
Creative Card Crew - not a card (both projects apply)
Stamping Vacation - embellish it: use a corner (see the cardstock sticker I've used on project #1)
Raise the Bar - trees (again, see the sticker tree )
Challenges - Project #2
Totally Papercrafts - use your Christmas punches
Fussy & Fancy - anything but a card (both projects apply)
Lil Red Wagon - tag or bag
Creative Inspirations - a Christmas gift
Creative Card Crew - not a card


this is great,love that image,and great desing,too bless you for playing at,creative inspirations,this week,hugs cheryl xxxxx
ReplyDeleteHiya
ReplyDeleteGreat bag that elf is so cute! thanks for joining us at pollycraft
Joey.xx
Super cute!
ReplyDeleteI also wanted to let you know that I have some yummy blog candy on my blog!
http://tammyleestampcorner.blogspot.com/2010/11/blog-candy-now.html
Tammylee
A gorgeous page & goodie bag, thanks for joining us at Pollycraft & good luck.
ReplyDeleteHugs Emma x
Great projects, Shelley. Thanks for joining us over at Cards for Men and good luck with the blog hop.
ReplyDeleteDonna x
Very cute!Thanks for joining us at Little Red Wagon:)
ReplyDeleteJoanne xo
I love what you did with the elf!
ReplyDeleteKathy
Lovely gifts, thanks for joining in with our challenge at Creative Inspirations,
ReplyDeleteEm.x
Great job, Shelley! You've been busy!
ReplyDelete